Constuction Pics
Control Panel Guts
Ultimarc MiniPac with Trackball, Joysticks & Buttons, Oh My!

My Buddy Gizz being very precise. This is one side of the cabinet.
Gizz is marking up by the area where the game marquee will eventually be.
We opted to build the sides first and then decide how wide to go--we even talked about making the cab narrower at the back to accomodate the Game Screen, but the geometry got frustrating and we were kind of wary of making it front heavy, so we left it according to LuSid's design.
We did scale up the design a little to make the top a little taller than 6 feet with 2" casters--metal, too small, too expensive, and dummy (me) bought two swivel & two straight rollers and put them on the machine so that it won't go anywhere smoothly.

Below:
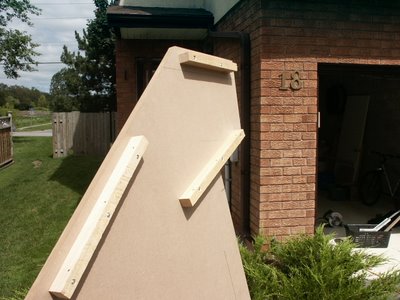
Close-up of the top of the right side. The cleats were amazing. We made a jig which put the cleats exactly the distance away from the edge to match perfectly with MDF Panels it would receive.
Here you can see the cleats for the Top panel, the speaker angled shelf and the top back 45degree angle cleat.

Controll Panel
MiniPac
Ultimarc Trackball with mounting plate
Two Players, 6 Button Fighter Array
Two Mouse Buttons
Green Credit Buttons
P1 & P2 Starts
Admin Buttons

Added later Oscar V2 Spinner
Below:
Right side panel with scrap for mock up of width.
Actually kind of an overly cautious move, but it ended up working ok.
I decided to go on the cheap and recycle an old TV for the screen, around the house I had a 24", a 19", but I really wanted to put in a 27", so I put off making the final width decision until I could afford the 27", which I eventually found at a pawn shop for $125. SOLD!

So this is what Jeffy's Arcade looked like after about 1 day of marking, cutting , and screwing--er, mating (no that's worse)-- ASSEMBLY!

Some little custom pieces
(MAMed Wireless mouse and Keyboard)

1st day of Assembly with the control panel--can you feel it?
 In its first home.

Control Panel Guts
Ultimarc MiniPac with Trackball, Joysticks & Buttons, Oh My!

My Buddy Gizz being very precise. This is one side of the cabinet.
Gizz is marking up by the area where the game marquee will eventually be.
We opted to build the sides first and then decide how wide to go--we even talked about making the cab narrower at the back to accomodate the Game Screen, but the geometry got frustrating and we were kind of wary of making it front heavy, so we left it according to LuSid's design.
We did scale up the design a little to make the top a little taller than 6 feet with 2" casters--metal, too small, too expensive, and dummy (me) bought two swivel & two straight rollers and put them on the machine so that it won't go anywhere smoothly.

Below:
Close-up of the top of the right side. The cleats were amazing. We made a jig which put the cleats exactly the distance away from the edge to match perfectly with MDF Panels it would receive.
Here you can see the cleats for the Top panel, the speaker angled shelf and the top back 45degree angle cleat.

Controll Panel
MiniPac
Ultimarc Trackball with mounting plate
Two Players, 6 Button Fighter Array
Two Mouse Buttons
Green Credit Buttons
P1 & P2 Starts
Admin Buttons

Added later Oscar V2 Spinner
Below:
Right side panel with scrap for mock up of width.
Actually kind of an overly cautious move, but it ended up working ok.
I decided to go on the cheap and recycle an old TV for the screen, around the house I had a 24", a 19", but I really wanted to put in a 27", so I put off making the final width decision until I could afford the 27", which I eventually found at a pawn shop for $125. SOLD!

So this is what Jeffy's Arcade looked like after about 1 day of marking, cutting , and screwing--er, mating (no that's worse)-- ASSEMBLY!

Some little custom pieces
(MAMed Wireless mouse and Keyboard)

1st day of Assembly with the control panel--can you feel it?
 In its first home.

2 Comments:
How did you get the TV to turn on at the same time with the PC hardware and other cabinet stuff? Did you drill a hole in the bezel to turn on the TV separately?
I turn on the TV with the remote and the PC with the normal power button. Here is a link to a usb switch I just got.
http://www.tigerdirect.com/applications/SearchTools/item-details.asp?EdpNo=1109367&CatId=1284
A review is upcoming, so by sure to check the RetroBlast website!
Merry CHRISTmas
jeff
Post a Comment
<< Home